
Do you want to create a decentralized application but are overwhelmed with the Web3 tech stack? If so, this NodeJS Web3 tutorial can help you get started as it presents the easiest way to build dapps. Furthermore, in this article, you have the chance to follow along as we take on a NodeJS Web3 example that will teach you the basics, and you’ll explore the essential tools and how to use them. As a result, you’ll know how to fetch on-chain data, which will be effortless thanks to Moralis’ enterprise-grade Web3 APIs. Moreover, we decided to make this tutorial as beginner-friendly as possible. Thus, you’ll be able to complete today’s NodeJS Web3 example by simply copying our code.
In addition, we’ll show you how to obtain your Moralis Web3 API key. The latter will give you access to the ultimate Web3 API – your gateway to developing dapps (decentralized applications). With the power of Moralis by your side, you’ll get to contribute to Web3 with NodeJS without breaking a sweat.
Additionally, since Moralis is all about cross-chain interoperability, you’ll get to use today’s NodeJS Web3 tutorial to tackle various blockchains. Hence, you can stick to the leading programmable chain, Ethereum, or focus on other reputable EVM-compatible chains. In either case, you must first create your free Moralis account. However, before diving deeper into our main topic, let’s ensure you all know the basics.
What is NodeJS?
NodeJS, also Node.js, is a programming platform or environment. It was launched back in 2009, with its primary purpose to help devs manage some of the complexities of JavaScript (JS). Moreover, Web3 with NodeJS expands the possibilities for dapp development. Also, NodeJS was built on Chrome’s JavaScript runtime, making it easier for developers to build scalable, high-performance apps. Ultimately, here are NodeJS’s core characteristics:
Event-Driven, Non-Blocking I/O Model – NodeJS utilizes an event-driven, non-blockchain I/O model. This prevents the node process from locking up the entire web application when retrieving a sole response. Instead, it simply continually runs and moves on to the next event until the event queue is empty. Moreover, NodeJS uses a unique event model. This model, besides a library, also uses an event loop as a runtime constructor. That event model can start an event loop without a “blocking call”. Thanks to these features, NodeJS is lightweight, efficient, and suitable for real-time applications across decentralized networks.Client-Side and Server-Side – NodeJS is able to run on the client-side (frontend) and server-side (backend). Accordingly, it enhances the use of JavaScript. Thanks to these real-time, two-way connections of web applications, both the server and client can initiate communications and freely exchange data.Reuse Code – NodeJS enables developers to reuse code. This is where the NodeJS packing manager (NPM) enters the scene. Also, developers can complete their programming tasks with over a million packages. Furthermore, developers who run JavaScript-heavy applications particularly benefit from reusing code. That way, they avoid the added burden of context-switching between edit and search tools.
Nonetheless, proper support for real-time data exchange and communication is essential when dealing with public blockchains, which is exactly what NodeJS supports.

Why Use a NodeJS Web3 Example from Moralis?
The above image shows the main advantages of NodeJS for developers and users. These key benefits are compelling as they address some important aspects of creating web applications. The majority of these pros come from the core NodeJS characteristics presented in the previous section. Hence, when exploring NodeJS, it’s definitely worth learning how to use NodeJS the easy way. This is where the Moralis NodeJS Web3 tutorial enters the scene. In today’s example, you will learn to dive into Web3 with NodeJS and learn about Moralis and its powerful API. Consequently, you’ll be able to use the tools that this API provider offers to take your Web3 development game to the next level.
With that said, make sure to roll up your sleeves and follow our lead.

Create a Dapp for Web3 with NodeJS – NodeJS Web3 Tutorial
If you decide to follow our lead as we take on today’s NodeJS Web3 tutorial, you’ll learn to complete the following five steps:
Create a NodeJS ApplicationImport and Set Up the Latest Moralis JS SDKSet Up a Simple Express ServerIntegrate Your App with Moralis ServicesFetch Blockchain Data
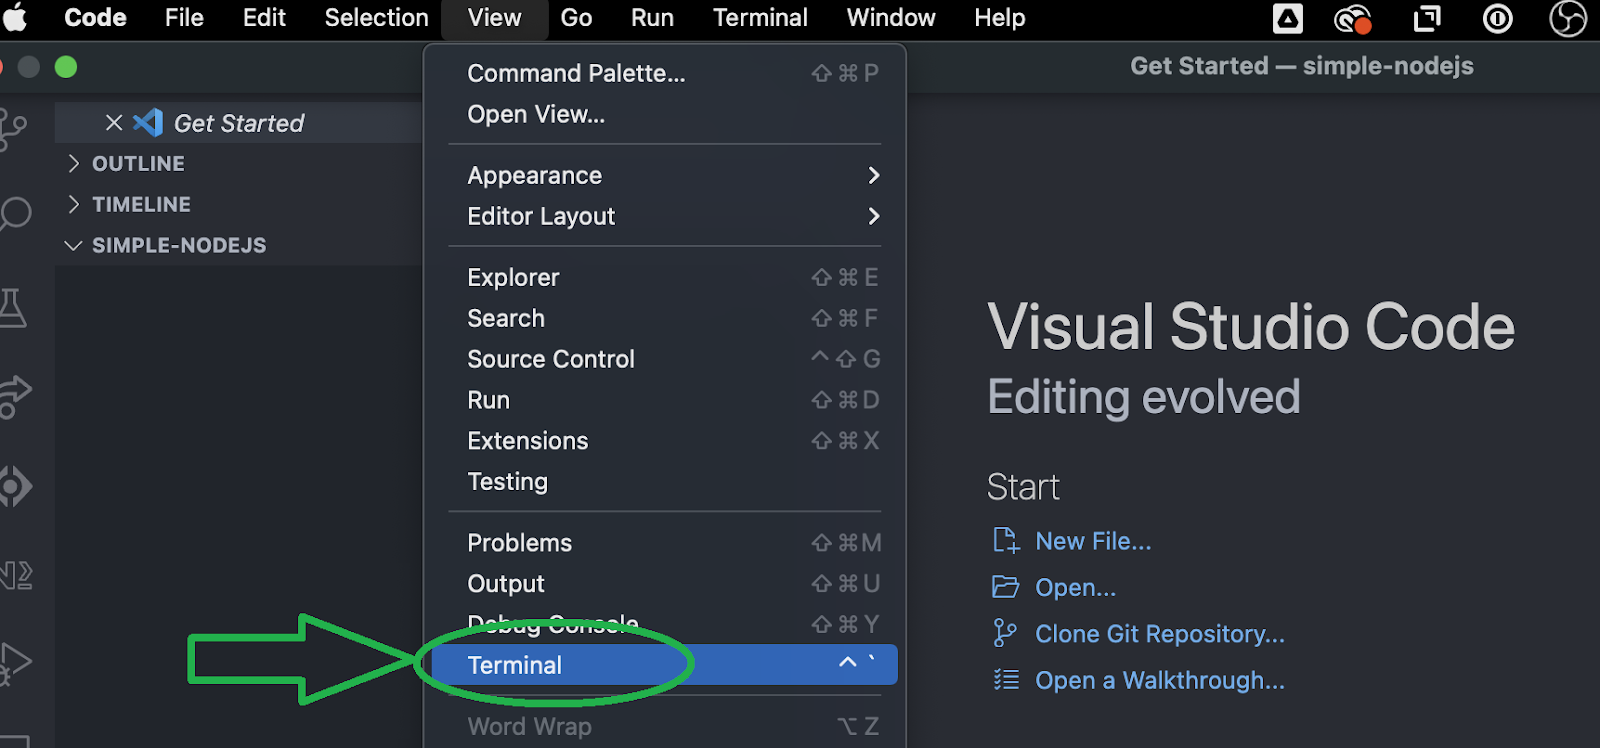
As you can see, there’s quite a lot of ground to cover. Thus, let’s dive right into the first step. But before moving any further, make sure you have Visual Studio Code installed and set up, NodeJS installed, and your free Moralis account ready. These are also the three prerequisites to today’s quest. Next, launch your VSC terminal and follow our lead:
Create a NodeJS Application
We’ll first create a new folder and open it in Visual Studio Code (VSC). We’ll name our folder “Simple-NodeJS”. Then, we use our terminal and enter the “npm init” command. Next, we name our project and stick to the default options by pressing enter a few times. By doing so, we end up with a new “package.json” file that includes the following lines of code:
{
“name”: “simple-nodejs-demo”,
“version”: “1.0.0”,
“description”: “”,
“main”: “index.js”,
“scripts”: {
“test”: “echo \”Error: no test specified\” && exit 1″
},
“author”: “”,
“license”: “ISC”
}
Import and Set Up the Latest Moralis JS SDK
When it comes to importing and setting up the latest Moralis JS SDK, we only need to execute a single command. Essentially, we just need to install the “moralis” dependency. However, we can use a single command to also install the “express” dependency. So, we proceed by entering the “npm install moralis express” command in our terminal.
npm install moralis express

Set Up a Simple Express Server
By entering the above command, we already have the “express” dependency installed. Hence, we can proceed with setting up a simple Express server. Create the “index.js” file and use the following lines of code:
const express = require(‘express’)
const app = express()
const port = 3000
app.get(‘/’, (req, res) => {
res.send(‘Hello World!’)
})
app.listen(port, () => {
console.log(`Example app listening on port ${port}`)
})
We must also revisit the “package.json” file and add the “start” script:
“scripts”: {
“start”: “node index.js”
},
Now that our “index.js” file is ready and we’ve set the “start” script in place, we can run our Express server. Again, a simple command – “npm run start” – is all we need. Then, we can use our favorite browser to visit “http://localhost:3000″ and make sure it displays the “Hello World!” greeting.

Integrate Your App with Moralis Services
With the first three steps of our NodeJS Web3 tutorial under our belts, it’s time we focus on integrating our app with Moralis services. In order to complete this step, we’ll use the above-created “index.js” file. This is where we’ll paste in our Moralis Web3 API key. However, we must first import Moralis and the “EvmChain” data type:
// Import Moralis
const Moralis = require(‘moralis’).default
// Import the EvmChain dataType
const { EvmChain } = require(“@moralisweb3/evm-utils”)
Then, we add the “MORALIS_API_KEY”, “address”, and “chain” variables:
// Add a variable for the API key, address, and chain
const MORALIS_API_KEY = “replace_me”
const address = “replace_me”
const chain = EvmChain.ETHEREUM
As you can see above, we need to replace the “replace me” placeholder with our actual API key. We’ll do that in a bit, but let’s also point out that we decided to focus on the Ethereum chain. However, we could’ve easily focused on any other EVM-compatible chain Moralis supports:
Ethereum Testnets:ROPSTENRINKEBYGOERLIKOVANSEPOLIAPOLYGONMUMBAIBSCBSC_TESTNETAVALANCHEFUJIFANTOMCRONOSCRONOS_TESTNET
Before we obtain our Moralis Web3 API key, we also need to initialize Moralis with the following lines of code:
const startServer = async () => {
await Moralis.start({
apiKey: MORALIS_API_KEY,
})
Moralis Web3 API Key – How to Get It?
To get the Moralis Web3 API key, log in to your Moralis account. Once inside our admin area, you must go to the “Web3 APIs” page. There, use the copy icon to copy the API key. Basically, obtaining your Moralis Web3 API key is a simple two-step process:

Of course, we must return to our “index.js” file and paste the above-copied key next to the “apiKey” variable. Ultimately, this is the content of our “index.js” file so far:
const express = require(‘express’)
// Import Moralis
const Moralis = require(‘moralis’).default
// Import the EvmChain dataType
const { EvmChain } = require(“@moralisweb3/evm-utils”)
const app = express()
const port = 3000
// Add a variable for the api key, address and chain
const MORALIS_API_KEY = “replace_me”
const address = “replace_me”
const chain = EvmChain.ETHEREUM
app.get(‘/’, (req, res) => {
res.send(‘Hello World!’)
})
// Add this a startServer function that initializes Moralis
const startServer = async () => {
await Moralis.start({
apiKey: MORALIS_API_KEY,
})
app.listen(port, () => {
console.log(`Example app listening on port ${port}`)
})
}
// Call startServer()
startServer()
Fetch Blockchain Data – Web3 with NodeJS Examples
Now that we’ve completed the above four steps, it’s time we explore Web3 with NodeJS. This is the part of today’s NodeJS Web3 tutorial where you’ll learn how to fetch native balance, ERC-20 balance, and NFTs. Fortunately, the Moralis API offers powerful and practical endpoints for each of these blockchain pieces of information. So, let’s look at three powerful examples of fetching on-chain data.

Fetch Native Balance
When it comes to fetching the native balance, which in our case is the Ethereum balance, we can use Moralis’ “getNativeBalance” endpoint. To use this endpoint in our “index.js” file, we’ll create the “getDemoData” function:
async function getDemoData() {
// Get native balance
const nativeBalance = await Moralis.EvmApi.balance.getNativeBalance({
address,
chain,
})
// Format the native balance formatted in ether via the .ether getter
const native = nativeBalance.result.balance.ether
return { native }
}
Looking at the above lines of code, you can also see that we are using “.ether” to display the native balance in the proper format.
Note: You can explore the entire array of Moralis’ EVM API endpoints in the Moralis documentation.
In addition, for our dapp to properly return the results of the above “getDemoData” function, we must also add the “/crypto-data” endpoint:
app.get(“/demo”, async (req, res) => {
try {
// Get and return the crypto data
const data = await getDemoData()
res.status(200)
res.json(data)
} catch (error) {
// Handle errors
console.error(error)
res.status(500)
res.json({ error: error.message })
}
})
Essentially, the lines of code above enable us to call the “/crypto-data” endpoint using the “http://localhost:3000/demo” address. This call returns the native balance in the following format:
{
“native”: “0.169421625822962794”
}

Fetch ERC-20 Balance
When it comes to fetching ERC-20 balances, things follow the native balance’s lead. As such, we need to complete steps similar to the ones above. However, this time we focus on using the “getWalletTokenBalances” endpoint from the “token” API group:
// Get token balances
const tokenBalances = await Moralis.EvmApi.token.getWalletTokenBalances({
address,
chain,
})
// Format the balances to a readable output with the .display() method
const tokens = tokenBalances.result.map((token) => token.display())
// Add tokens to the output
return { native, tokens }
}
Looking at the lines of codes above, you can see that we again ensure the balances are displayed properly. We also added “tokens” to our “return” parameter.

Fetch NFTs
Finally, we will complete the last stage of our NodeJS Web3 example – fetching NFTs. To do this successfully, we’ll yet again implement similar lines of code as for the native and ERC-20 balances. This time, we will use the “getWalletNFTs” endpoint from the “nft” API group. Furthermore, we will focus on fetching the first ten NFTs for a given address. Of course, we will do this with our “getDemoData” function. In addition, we also need to format the output properly. Nonetheless, we must not forget to add “nfts” to “return“:
// Get the nfts
const nftsBalances = await Moralis.EvmApi.nft.getWalletNFTs({
address,
chain,
limit: 10,
})
// Format the output to return name, amount and metadata
const nfts = nftsBalances.result.map((nft) => ({
name: nft.result.name,
amount: nft.result.amount,
metadata: nft.result.metadata,
}))
// Add nfts to the output
return { native, tokens, nfts }
}
NodeJS Web3 Tutorial – The “index.js” Example File
At this point, we have successfully implemented successful fetching of the native balance, ERC-20 balance, and NFTs in our NodeJS dapp. Consequently, we’ve finished our NodeJS Web3 tutorial. However, to assist you even further and help you avoid making any mistakes while putting the above lines of code together, you can find the entire code below. Simply copy and paste it into VSC. Also, remember to replace “replace_me” with the “MORALIS_API_KEY” variable. Nonetheless, if you want to explore other blockchains, replace “ETHEREUM” with one of the other supported chains as listed in the “Integrate Your App with Moralis Services” section above.
So, here’s the entire code for the “index.js” file:
const express = require(“express”)
const Moralis = require(“moralis”).default
const { EvmChain } = require(“@moralisweb3/evm-utils”)
const app = express()
const port = 3000
const MORALIS_API_KEY = “replace_me”
const address = “0x9e8f0f8f8f8f8f8f8f8f8f8f8f8f8f8f8f8f8f8f”
const chain = EvmChain.ETHEREUM
async function getDemoData() {
// Get native balance
const nativeBalance = await Moralis.EvmApi.balance.getNativeBalance({
address,
chain,
})
// Format the native balance formatted in ether via the .ether getter
const native = nativeBalance.result.balance.ether
// Get token balances
const tokenBalances = await Moralis.EvmApi.token.getWalletTokenBalances({
address,
chain,
})
// Format the balances to a readable output with the .display() method
const tokens = tokenBalances.result.map((token) => token.display())
// Get the nfts
const nftsBalances = await Moralis.EvmApi.nft.getWalletNFTs({
address,
chain,
limit: 10,
})
// Format the output to return name, amount and metadata
const nfts = nftsBalances.result.map((nft) => ({
name: nft.result.name,
amount: nft.result.amount,
metadata: nft.result.metadata,
}))
return { native, tokens, nfts }
}
app.get(“/demo”, async (req, res) => {
try {
// Get and return the crypto data
const data = await getDemoData()
res.status(200)
res.json(data)
} catch (error) {
// Handle errors
console.error(error)
res.status(500)
res.json({ error: error.message })
}
})
const startServer = async () => {
await Moralis.start({
apiKey: MORALIS_API_KEY,
})
app.listen(port, () => {
console.log(`Example app listening on port ${port}`)
})
}
startServer()
NodeJS Web3 Tutorial – Create Dapps Using a NodeJS Web3 Example – Summary
Today’s guide was all about using NodeJS for Web3 development. As such, you had a chance to follow our NodeJS Web3 tutorial and create your own backend dapp. You also learned how to set Moralis’ Web3 functionalities in place and how to make Web3 API calls to fetch all sorts of on-chain data. As a result, you are now ready to take your dapp development further. For instance, you can take the above backend and simply link it to a React or NextJS app. On the other hand, you may take an even faster path by simply using our ultimate Web3 website template.
We encourage you to level up your Web3 development skills by taking on tutorials that await you in the Moralis documentation, the Moralis YouTube channel, and the Moralis blog. These outlets can help you become a blockchain developer for free. For instance, some of the latest topics show you how to connect dapps to Cronos, build BNB Chain dapps, set up and connect a dapp to the Ethereum network, connect a dapp to Polygon, clone Zapper, how to integrate blockchain-based authentication, set up a self-hosted Parse Server, and much more.
You may also want to explore professional blockchain development courses at Moralis Academy. For instance, you can enroll in a course that will teach you how to build a DEX (decentralized exchange) using JavaScript. Nonetheless, by completing the courses at Moralis Academy, you become blockchain certified. In turn, you greatly improve your chances of landing your crypto dream job. Enroll in Moralis Academy today, and take your first steps toward a life-changing career!


")


